Rotating Gears of Hate
Today we will walk through setting up actual rotating gears for the Gears of Hate in Tomb of Annihilation! We’ll be using Foundry VTT, some macros, and a fair bit of patience.
Credit to Erogroth in the TOA discord for actually figuring this out, or at least sharing with us!
If you see me highlight things like this, I am doing so to call out a menu option or type of object or variable type thingy within Foundry.
Let’s get started!
Requirements
- Foundry VTT with the following mods:
- Vehicles and Mechanisms
- Multilevel Tokens this is a dependency of the above
- Map Art with tiles for the gears
- A little bit of patience
You absolutely need some copy of a map, and art assets to use as gears. In my photos I am using a map under development by a fellow DM. Come find us in the ToA Discord if you want to know more. Multiple version of art have been posted there that should work for this. Otherwise, you can use an image editor of your choice to cut out the gears from the map to create your own assets.
Building the Rotating Gears
- Set up the map as normal with
walls,tokens,lights, whatever you want. - Create three
characters(type does not matter) with easy to recall names that will represent you gears. I like something along the lines ofGear1,Gear2,Gear3. - Place
tokensfor those characters on the map, preferably somewhere outside thewallswhere the PCs could ever see them. You could also just hide them, but I like having them off on the far side of the map. -
Use the
Drawingtool to create acirclearound your first gear. This circle needs to completely enclose thewallsof a given gear without thewallspassing through the circle. See the image below for an example:
- Double click the circle
drawingobject to bring up the object’s menu, and navigate to theVehiclestab - Set the following options:
Capture Tokens: AutoCapture Tiles: ManualCapture Walls: ManualName of Controller Token: the name you gave for thecharactercreated above for this gear.Token Control Scheme: Relative
- Click
Update Drawing - Right click the
drawingobject and on the right side, click theCapture Nowbutton. It looks like a steering wheel. There is also aReleasebutton if you need to undo this to fixwallsor something else.
So what just happened? You are using the circle drawing object to define the vehicle that is your gear. It will later apply the movement effects we will define in the macros. You absolutely need to make sure all the walls are completely within the boundary, otherwise the segments that pass through will NOT rotate. We are setting Capture Token to Auto so that any token within the circle will get caught. We are manually capturing the walls and tiles (the gear) so nothing weird happens down the road.
Now do steps 4 through 8 again for EACH gear. Once you have finished, you have set up the three vehicles we are going to manipulate with macros.
Making the Macros
Now for the scary part. We are going to do some coding. We will make five macros. There are many ways to do this, but here is mine:
- Create a new
compendiumcalled “Gear Macros” or something similar and keep the dialogue window open. - If you don’t have any
macrosin yourhotbarat the bottom of the screen, click the first empty space. This will open a newmacro. - Set the
nameto “Gear 1” or something like that. - Set
Typetoscript -
Paste the code below in: Each macro will follow this pattern:
 let
 token1 = canvas.tokens.placeables.find(t => t.data.name === "Gear1"),
 token2 = canvas.tokens.placeables.find(t => t.data.name === "Gear2"),
 token3 = canvas.tokens.placeables.find(t => t.data.name === "Gear3");

 (async ()=>{
   if(!token1 || !token2 || !token3) return;

   await token1.update({ rotation : 1 });
   await token2.update({ rotation : 1 });
   await token3.update({ rotation : 1 });
 })();
Here is an image, using names and variables from my game that don’t 100% match my examples here:
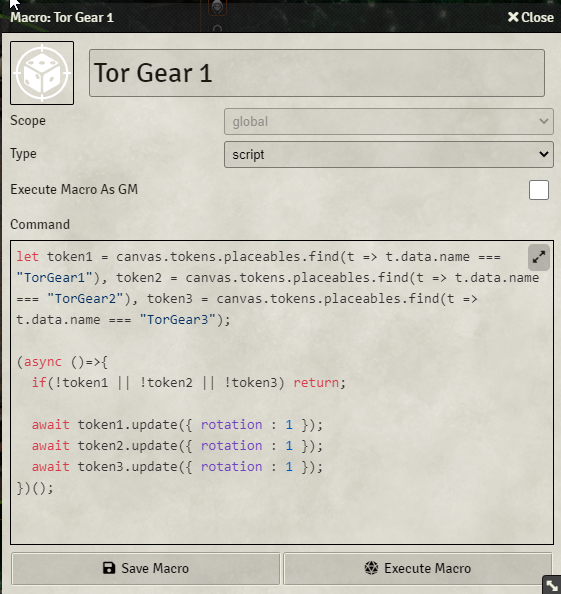
Let’s pause and dissect this a bit so you understand what is happening.
 let
 token1 = canvas.tokens.placeables.find(t => t.data.name === "Gear1")
This code is creating a variable in the script that is assigning the token1 value to your first character.
 (async ()=>{
   if(!token1 || !token2 || !token3) return;

   await token1.update({ rotation : 1 });
   await token2.update({ rotation : 1 });
   await token3.update({ rotation : 1 });
This section is setting the token rotation for each token to the degree specific in
rotation : 1. In this case, the rotation is 1 degree (out of 360). - Where I wrote “Gear1”, “Gear2”, “Gear3”, replace with your own names for the
charactersand thecontrolleryou created and set earlier. - Save the
macro - Drag that
macrointo theCompendiumI told you to make so you can find it again if you need to. -
Read the following, and proceed to step 10.
Because our drawing is controlled by three
tokens(we made them and set them ascontrollersin thedrawingvehiclestab earlier for each of the three circles), setting thetokenrotation will rotate each gear to the value ofrotation. Now, we can do some maths and determine that a circle of 360 degrees, divided into 5, gives a nice result of 72. This means we can increment our gears by 72 degrees across 5macrosto hit all the positions.You can find the positions in various places, but I’ll save you the trouble. Our gears should be set up to have the following five positions:
Position Gear 1 Degree Gear 2 Degree Gear 3 Degree 1 1 1 1 2 288 72 288 3 216 144 216 4 144 216 144 5 72 288 72 Also, in case you want to get fancier, the Foundry Macro page is here.
-
Create four more
macros, with thetokensupdated and therotationvalues set up as above. -
(Bonus) You can also add in sounds using something like this at the top of each
macro:## Forge hosted (don't include this line) AudioHelper.play({src:"https://assets.forge-vtt.com/5e8c9c4f91f93735fd124a3d/Music/AMBIENT/gears.mp3?fbclid=IwAR14huadnbNNrsOpRWj8gwgAtjNVWlDXAzw2kNopLLAm4jkJuPLbpSzBhKI", volume: 0.100, autoplay: true, loop: false}, true);## Locally Hosted (don't include this line) AudioHelper.play({src:"Audio/Sounds/gears_of_hate.mp3", volume: 0.500, autoplay: true, loop: false}, true);
And that is it! You should now have five macros that let you cycle the positions of the gears. Good luck!
Troubleshooting
If something is not working right, check each step from the beginning. It may take a few tries to get this right. I had to try about 3 times to get it all working. I ran into issues at most steps, and have tried to explain as much as I can here without going into insane depth. If you get stuck, either take a break an/or just start over. Test this before you use it, and if you add sound, test as a player!
Good luck and have fun!